Table of Contents
ToggleHomeowners face a consistent challenge: too much stuff, not enough space. The average American home has grown over the decades, yet clutter remains a persistent problem. Onsite storage solutions address this head-on by maximizing every square foot without renting offsite units or purging belongings unnecessarily. Whether tackling a cramped closet or retrofitting an unused nook, the right approach transforms wasted space into functional storage that actually works with daily routines.
Key Takeaways
- Onsite storage solutions maximize existing home space without renting offsite units, increasing property value while reducing clutter-related stress and time spent searching for items.
- Custom closet systems and built-in storage reclaim up to 40% of unused vertical space through double hang rods, adjustable shelving, and pull-out accessories tailored to lifestyle needs.
- Portable modular systems like wire shelving and cube organizers offer flexibility for renters and those testing layouts before committing to permanent built-in installations.
- Proper installation requires securing all storage to studs with appropriate fasteners; overhead racks must attach to ceiling joists, never drywall alone, to safely support 300–600 lbs.
- Match storage type to usage frequency—daily items near entryways, seasonal items in harder-to-reach spaces, and archives on high shelves—while considering environmental factors like moisture in basements and garages.
- Budget ranges from $50–150 for DIY wire shelving to $3,000+ for custom cabinetry, making honest assessment of DIY skill essential before choosing between portable systems and structural modifications.
What Are Onsite Storage Solutions and Why They Matter
Onsite storage solutions refer to any organizational system integrated directly into a home’s existing footprint. Unlike renting a storage locker across town, these solutions use underutilized areas, closets, crawl spaces, wall cavities, garage ceilings, to create accessible, purpose-built storage.
The benefits go beyond decluttering. Effective onsite storage increases home value (real estate appraisers note organized spaces as a selling point), reduces stress from visual clutter, and cuts time spent hunting for misplaced items. A well-designed system also protects belongings from damage caused by haphazard stacking or moisture exposure.
Most importantly, onsite solutions adapt to lifestyle needs. A family with young kids prioritizes toy rotation and mudroom hooks. Empty nesters might convert a bedroom into a hobby room with built-in shelving. The key is matching storage type to usage patterns, not forcing generic bins into every corner.
Before starting any project, assess load-bearing walls, electrical wiring, and plumbing runs. Structural modifications require permits in most jurisdictions. Cosmetic additions like freestanding shelves don’t, but anything involving studs, joists, or ceiling penetration might.
Built-In Storage Options for Maximum Space Efficiency
Built-in storage integrates directly into a home’s structure, offering permanence and space efficiency that freestanding units can’t match. These projects range from weekend DIY to full contractor jobs.
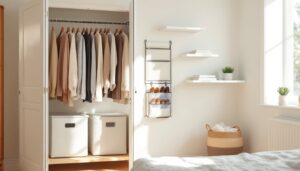
Custom Closets and Wardrobe Systems
Custom closet systems reclaim vertical space and eliminate dead zones. Standard builder-grade closets waste up to 40% of available volume with a single rod and shelf. A well-planned system uses double hang rods (upper at 80″, lower at 40″ from the floor), adjustable shelving, drawer units, and pull-out bins.
Materials matter. Melamine-coated particleboard costs $2–4 per square foot and handles light loads (folded clothes, shoes). Plywood with edge banding runs $4–7 per square foot, supports heavier items, and takes paint or stain. Avoid MDF in damp climates, it swells irreversibly.
Many homeowners design closet storage solutions using modular systems from manufacturers like ClosetMaid or Rubbermaid. These kits include tracks, brackets, and wire or laminate shelves. Installation requires a level, drill, and stud finder. Secure all vertical standards into studs (typically spaced 16″ on center) with 3″ screws to prevent sag under load.
For reach-in closets narrower than 6 feet, prioritize vertical dividers to prevent clothing piles from toppling. Walk-in closets benefit from corner units and pull-out accessories (belt racks, jewelry trays). If budget allows, hire a professional for complex layouts, poor planning leads to unusable corners and awkward reach zones.
Under-Stair and Ceiling Storage Ideas
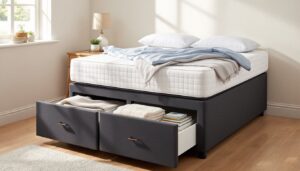
Under-stair storage turns a 30–50 cubic foot cavity into usable space. The simplest approach: build a hinged access door in the drywall, add shelving inside. For better access, install pull-out drawers on full-extension slides rated for the load (100–150 lbs per pair for household items).
Framing a built-in requires cutting into existing drywall, identifying stair stringers (the angled supports), and attaching a ledger board to carry shelf weight. Use 2×4 framing for structural support, and ensure all cuts avoid plumbing or HVAC runs. This is a mid-level DIY project, expect a weekend with moderate carpentry skills.
Ceiling storage in garages or basements exploits overhead space. Overhead racks mount to ceiling joists (typically 2×8 or larger, spaced 16″ or 24″ on center) and hold bins, seasonal decor, or sporting equipment. Most steel racks support 300–600 lbs when properly installed into joists with lag bolts.
Always verify joist direction and condition before drilling. In finished spaces, use a stud finder with deep-scan mode. Exposed joists in garage storage solutions simplify installation. Keep stored items at least 12″ from the ceiling to maintain code-required clearance around light fixtures and sprinkler heads (if present).
Safety note: Never attach heavy storage to drywall alone. Drywall anchors rated for 50 lbs are insufficient for overhead loads. Miss a joist, and the rack comes down.
Portable and Modular Onsite Storage Systems
Not every storage problem requires a saw and drill. Portable and modular systems offer flexibility for renters, frequent movers, or anyone testing layouts before committing to built-ins.
Wire shelving units (chrome or epoxy-coated steel) assemble without tools using friction clips and adjustable posts. These units fit pantries, laundry rooms, and closets. Standard widths run 24″, 36″, 48″, and 60″: depths are 12″, 18″, or 24″. Each shelf typically holds 250–350 lbs when evenly distributed. Anchor tall units to the wall with tip-over straps to prevent accidents, especially in homes with children.
Modular cube systems (like IKEA Kallax or ClosetMaid Cubeicals) create customizable storage walls. Each cube fits fabric bins, baskets, or small items. These systems work well in playrooms, home offices, and entryways. Assemble units on a flat surface, and use L-brackets to secure them to wall studs if stacking more than two high.
Rolling carts and drawer units with locking casters provide mobile storage for craft supplies, tools, or pantry overflow. Look for steel frames and ball-bearing drawer slides, cheap plastic wheels fail fast under load. Many DIYers incorporate easy storage solutions like these in multipurpose spaces where needs shift seasonally.
Pegboard and slat wall panels mount to studs or furring strips and accept hooks, bins, and tool holders. Pegboard (1/4″ tempered hardboard with evenly spaced holes) costs $10–15 per 4×8 sheet. Leave 1/2″ clearance behind the board so hooks insert fully. Slat wall (horizontal grooved panels) handles heavier items and gives a cleaner look. Both systems shine in garages, workshops, and mudrooms.
For homeowners with fluctuating storage needs, these systems adapt faster than built-ins. Reconfigure layouts as hobbies change, kids grow, or work-from-home setups evolve. The trade-off: less visual integration and lower weight capacity than permanent installations.
Choosing the Right Storage Solution for Your Space
Selecting the right onsite storage starts with honest assessment. Measure the space (height, width, depth), identify obstructions (outlets, vents, light switches), and note load-bearing considerations.
Match storage type to usage frequency. Daily-use items (keys, coats, shoes) belong in accessible zones like storage solutions for small spaces near entryways. Seasonal items (holiday decor, winter gear) can go in harder-to-reach spots like overhead racks or attic pull-down stairs. Archive storage (tax records, memorabilia) fits labeled bins on high shelves.
Consider environmental factors. Basements and garages experience temperature and humidity swings. Use plastic bins (not cardboard) for moisture resistance, and avoid storing wood furniture or paper directly on concrete floors, moisture wicks up and causes mold. In climate-controlled areas, any material works.
Budget appropriately. DIY wire shelving costs $50–150 per closet. Custom closet systems run $500–2,000 for materials, or $1,500–5,000 installed. Built-in cabinetry with hardwood and custom finishes starts at $3,000 and climbs fast. Complex projects like under-stair built-ins that require cutting into finished spaces often justify hiring a carpenter, expect $500–1,500 for a basic installation.
Think long-term. Freestanding units move with you: built-ins stay. In a forever home, investing in quality built-ins pays off in daily convenience and resale value. In a rental or starter home, prioritize portable systems. Many experts discussing organizational strategies emphasize flexibility for evolving needs.
Evaluate DIY skill honestly. Installing wire shelving or assembling modular cubes requires a drill, level, and an hour. Building a closet organizer with a miter saw, edge banding, and pocket screws demands intermediate carpentry skills. Anything involving structural changes (removing walls, installing headers, running electrical) calls for a pro or at least a knowledgeable DIY partner.
Safety and code compliance. Confirm local building codes before permanent installations. Some jurisdictions require permits for built-ins that alter electrical, plumbing, or structural elements. Always wear safety glasses when cutting, drilling, or using power tools. Use dust masks for sanding or cutting treated lumber. Keep fire extinguishers accessible in workshops. Resources like comprehensive home improvement guides provide additional safety checklists.
Finally, plan for growth. Adjustable shelving beats fixed heights. Modular systems expand easier than custom one-offs. Leave margin for future needs, kids’ toys become sports equipment, then college dorm overflow.
Conclusion
Onsite storage solutions turn chaos into function without sacrificing living space. Whether installing a full closet system, mounting overhead racks, or adding modular shelving, the right approach balances cost, skill level, and long-term needs. Start with high-impact areas, measure twice, and don’t skip the prep work. A well-executed storage project pays dividends every time someone opens a door and finds exactly what they need.